Mac-letterhead






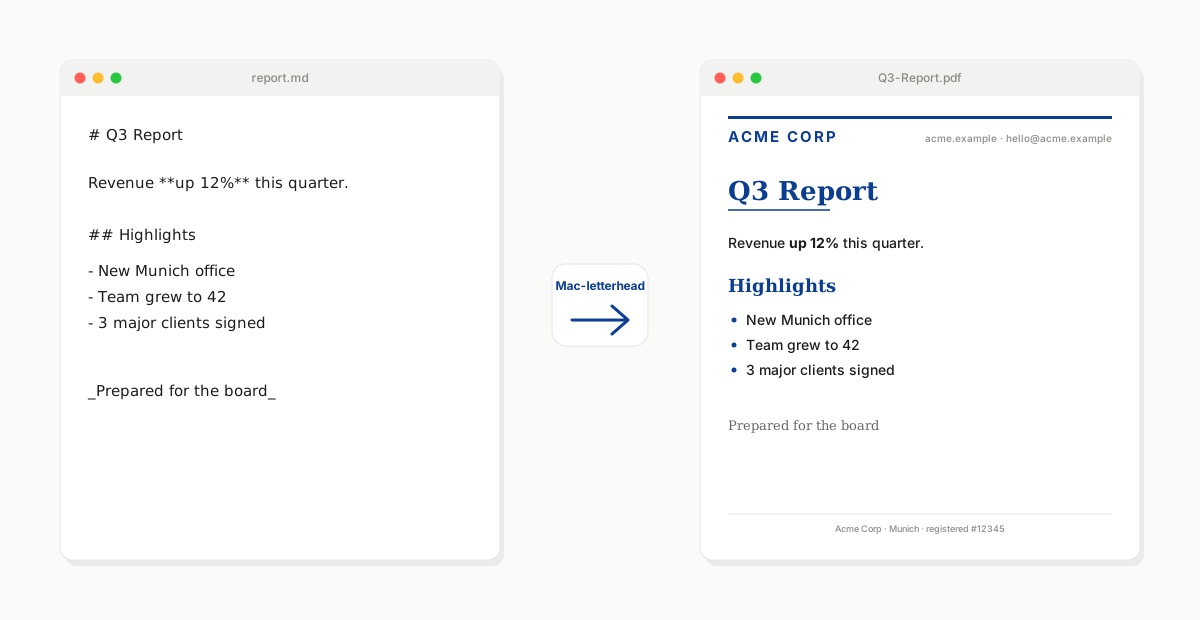
Turn any Markdown file into a professionally-branded PDF on your company's letterhead — with no manual formatting. Mac-letterhead treats your letterhead PDF as digital stationery: it prints your Markdown into the safe area of the page (never overlapping your header, footer, or logo) and applies your brand's typography from a small CSS file.
Runs entirely on your Mac. Same engine as a drag-and-drop droplet, a command-line tool, or a Model Context Protocol server that Claude and other AI clients can call directly.
- What it does
- Install
- Quick start (2 minutes)
- Use it — droplet · CLI · MCP server
- Configure & fine-tune — brand CSS · blend strategies · multi-page
- Advanced · Privacy · License
What it does
You have a company letterhead — a PDF with your logo at the top, contact info at the bottom, maybe a subtle watermark. You have documents to write, and they need to be on that letterhead: proposals, reports, invoices, memos.
The traditional options are all painful: Word templates that never quite line up, copy-paste-adjust cycles into a designer's InDesign file, or manually placing text over the letterhead in a PDF editor. Or just giving up and sending unbranded.
Mac-letterhead does the whole thing automatically. It analyzes your letterhead PDF to find the safe printable area (the space around the header, footer, and logo), renders your Markdown into that area with your brand's typography (fonts and colors from a tiny CSS file), and hands you a finished PDF. Multi-page letterhead? First-page vs subsequent pages? Handled.
The same tool ships as three interfaces — a Mac drag-and-drop app (for you), a command-line utility (for scripting), and an MCP server (so Claude and other AI clients can produce your branded documents on request).
Install
Pick one:
Homebrew (recommended for everyday Mac use):
brew tap easytocloud/tap
brew install mac-letterhead
uvx (no permanent install; uses uv's ephemeral env):
uvx mac-letterhead --help
Claude Desktop (double-click install):
Download the latest mac-letterhead-<version>.mcpb from the releases page and double-click it — Claude for macOS handles the rest.
System dependencies (optional but recommended)
For the best rendering quality (full CSS support via WeasyPrint), install the WeasyPrint system libraries once:
brew install pango cairo fontconfig freetype harfbuzz
Without them, Mac-letterhead falls back to ReportLab automatically — simpler output, no external deps, everything still works.
Quick start (2 minutes)
-
Put your letterhead somewhere Mac-letterhead can find it. The default convention is
~/.letterhead/<name>.pdf:mkdir -p ~/.letterhead cp /path/to/your-letterhead.pdf ~/.letterhead/company.pdf -
(Optional, but strongly recommended) Add typography. Create
~/.letterhead/company.csswith your brand's fonts and colors:body { font-family: "Inter", "Helvetica Neue", sans-serif; color: #1f2937; } h1, h2, h3 { color: #0b3d91; font-family: "Merriweather", Georgia, serif; } h1 { border-bottom: 2px solid #0b3d91; padding-bottom: 0.25em; } a { color: #0b3d91; }Skip this and Mac-letterhead uses a clean default.
-
Create the droplet on your Desktop:
mac-letterhead install --name "company"A
company.appappears on your Desktop. -
Drop any
.mdor.pdffile onto the droplet. Choose where to save. You get a letterheaded PDF.
That's it. Every subsequent document is one drop.
Use it
Same engine, three interfaces.
🖱️ Drag-and-drop droplet
Best for human workflows on a Mac. One-time setup, then every future document is a drag onto a Desktop icon.
mac-letterhead install --name "company"        # uses ~/.letterhead/company.{pdf,css}
mac-letterhead install --name "personal"       # a second droplet for personal docs
mac-letterhead install --name "client-acme"    # one droplet per client / brand
Each droplet is a full macOS .app bundle you can drag around, put in the Dock, or Automator-chain. Dropping a file on it opens a save dialog for the output location.
Double-click the droplet (without dropping anything) to see the safe-area preview for that droplet's letterhead — cut marks, colour-coded tint, source label, all in one PDF that opens in your default viewer. Handy for verifying "will Markdown land where I expect it" before committing to a merge.
⌨️ Command line
Best for scripting, CI, or one-shot conversions. No droplet needed.
# Markdown → letterheaded PDF
mac-letterhead merge-md ~/.letterhead/company.pdf "Q3 Report" ~/Desktop report.md

# Existing PDF → letterheaded PDF
mac-letterhead merge ~/.letterhead/company.pdf "Contract" ~/Desktop contract.pdf

# Preview the safe area (cut marks + tint) as a PDF
mac-letterhead preview ~/.letterhead/company.pdf
Full reference: mac-letterhead --help.
🤖 MCP server for AI clients
Best when you want Claude, Claude Code, Cursor, Windsurf, or another AI assistant to produce branded documents on demand.
Add to your Claude Desktop config (~/Library/Application Support/Claude/claude_desktop_config.json):
{
  "mcpServers": {
    "letterhead": {
      "command": "uvx",
      "args": ["mac-letterhead[mcp]", "mcp"]
    }
  }
}
Then in Claude: "Draft a Q3 investor update on our company letterhead." Mac-letterhead handles the formatting; the PDF lands in ~/Desktop.
Published on the official MCP Registry as io.github.easytocloud/mac-letterhead — visible on Glama and PulseMCP. For full MCP configuration (style-specific servers, multiple brands from one client), see README_MCP.md.
Configure & fine-tune
Preview and mark the safe area
Mac-letterhead needs to know where on your letterhead is safe to print content — the space between the header, footer, and any logos. It figures this out in three tiers:
- You mark it explicitly. Open your letterhead in Preview.app (Tools → Show Markup Toolbar → Rectangle), draw a box over the intended safe area, save. That's it — Preview.app doesn't offer any way to label annotations, so Mac-letterhead treats a single Square annotation on a page as the safe area even without a label. If you want to be unambiguous (or you're using a PDF editor that supports labeling), click your rectangle → sidebar → Description → type
safe-area(orprintable-area— case-insensitive, substring match). Then multiple rectangles per page work too — only the labeled one is used. - Auto-detected. No annotation → Mac-letterhead analyses the letterhead's layout (text, drawings, logos) and derives a safe rectangle that avoids them, with a ~40 pt safety pad.
- Fallback default. No content detected → 1-inch margins on every side.
Preview the resolution any time:
mac-letterhead preview ~/.letterhead/company.pdf
# writes ~/.letterhead/company-preview.pdf
Colour code in the preview PDF — glance to see how confident the tool is:
| Colour | Source | What it means |
|---|---|---|
| Green | annotation | You marked it. Trusted verbatim. |
| Slate blue | auto-detected | Heuristic derived it from the letterhead layout. |
| Amber | fallback default | No content detected. Consider marking it. |
Cut marks at each corner give print-native precision; a very subtle tint fills the region for gestalt. A tiny label at the bottom-left tells you which source drove the result and the safe area's exact dimensions.
Per-document options via YAML front matter
Any Markdown file can start with a YAML front-matter block declaring per-document overrides — the same convention Jekyll, Hugo, and Obsidian use. Mac-letterhead reads it, applies the options, and renders the body normally.
---
title: Q3 Investor Update
output-dir: ~/Documents/investor
page-numbers: alternate
blend-strategy: multiply
author: Erik
---

# Q3 Investor Update

Executive summary…
Supported fields (all optional, kebab-case, unknown fields are logged and skipped):
| Field | Values | Effect |
|---|---|---|
title | string | PDF title metadata + auto-generated filename |
output-dir | path (supports ~) | Where the resulting PDF is written |
page-numbers | bottom-right | bottom-center | bottom-left | alternate | See below. Omit to disable page numbers entirely (the default). |
blend-strategy | darken | multiply | overlay | transparency | reverse | Overrides the merge blend mode |
style | style name | Overrides the letterhead style (ignored on dedicated MCP servers — see README_MCP.md) |
author, subject | string | PDF metadata |
page-numbers: alternate is designed for booklet-style multi-page letterheads: page 1 is treated as a title page (no number), subsequent left-hand pages get the number bottom-left, right-hand pages bottom-right. Requires the WeasyPrint backend.
Precedence (most-specific wins):
explicit CLI/MCP arg > front matter > server/droplet defaults > hard-coded
So if an MCP tool call passes output_path=… explicitly and the document says output-dir: …, the MCP arg wins. Front matter fills in what the caller left unspecified.
Brand your typography with CSS
The letterhead PDF supplies the visual identity (logo, header, footer). CSS supplies the typography: fonts, colors, spacing, table styling, heading treatment. Together they make one reusable brand identity that any Markdown document can be rendered through.
Full example — ~/.letterhead/company.css:
body        { font-family: "Inter", "Helvetica Neue", sans-serif; color: #1f2937; }
h1, h2, h3  { color: #0b3d91; font-family: "Merriweather", Georgia, serif; }
h1          { border-bottom: 2px solid #0b3d91; padding-bottom: 0.25em; }
a           { color: #0b3d91; text-decoration: underline; }
code, pre   { font-family: "JetBrains Mono", ui-monospace, monospace; background: #f5f7fa; }
table th    { background: #0b3d91; color: white; }
table td    { border-bottom: 1px solid #e5e7eb; }
blockquote  { border-left: 3px solid #0b3d91; color: #4b5563; }
CSS is applied inside the safe area, so branded typography stays clear of your header, footer, and logo automatically. (CSS is applied by the WeasyPrint backend; the ReportLab fallback supports a reduced subset.)
Choose a blend strategy
Different letterheads need different overlay modes. Set with --strategy in the CLI, or when creating a droplet.
| Strategy | Best for |
|---|---|
darken (default) | Dark logo/artwork on light letterhead paper |
multiply | Watermark-like effects on subtle designs |
overlay | Better visibility across mixed contrasts |
transparency | Smooth blending with translucent layers |
reverse | Letterhead on top, content beneath |
Multi-page letterheads
Different letterhead template per page position:
| Letterhead PDF has… | Applied to |
|---|---|
| 1 page | Every document page |
| 2 pages | Page 1 → first document page; page 2 → all others |
| 3 pages | Page 1 → first; page 2 → even; page 3 → odd |
Advanced
- Rendering backends. WeasyPrint (preferred, full CSS support) with a ReportLab fallback. Install
brew install pango cairo fontconfig freetype harfbuzzto opt into WeasyPrint. - GitHub Flavored Markdown. Tables, task lists, strikethrough, code blocks with syntax highlighting — all supported when
pycmarkgfmis available (it's a default dependency). - Custom overrides.
mac-letterhead install --name X --letterhead /some/other.pdf --css /some/other.cssfor one-off droplets with non-conventional paths. - Publishing / release pipeline. Contributor-facing:
docs/publishing.md. - Operator guide. For contributors:
CLAUDE.mddocuments the architecture, release rules, and MCP registry constraints.
Privacy
Mac-letterhead runs entirely on your local machine. No network calls, no telemetry, no analytics, no cloud sync. See PRIVACY.md.
Contributing
See CONTRIBUTING.md.
License
MIT.